In this blog, we are going to start with Case Management in Pega.
Case Management is a very broad topics and it has a lot of points.
In this blog, I am going to show you, you can start with creating a new case type by following the best practices.
Business applications help clients to automate their work to achieve the the specific outcome. Various teams and people are involved in this journey to achieve this outcome. Within Pega, you can achieve this with the help of Case Type.
What is a Case Type?
Case Type is a business process used to define the business requirement with the help of different stages, processes & steps.
So within stages, we have processes & within processes, we have steps. In more simple words, this is one of the main business motive which client wants to achieve.
In this blog, we are going to take example of Claim Case. So, we need a case type to raise the Insurance Claim. The users will raise the claim request and later the claim will go the Review Process & BGV. When outcome of Review & BGV is positive, the claim case will be approved. Otherwise it will be rejected.
Now, lets first jump on to the Community Edition.
After logging in, if there is no case type, the system will give you a pop up to create a new new case type.

Before we create a new case type, as a standard practice, we are going to create a separate Ruleset for this Case type.
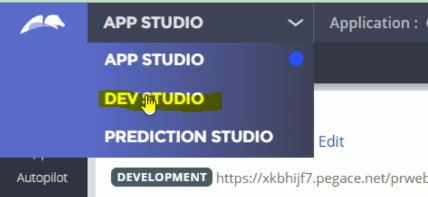
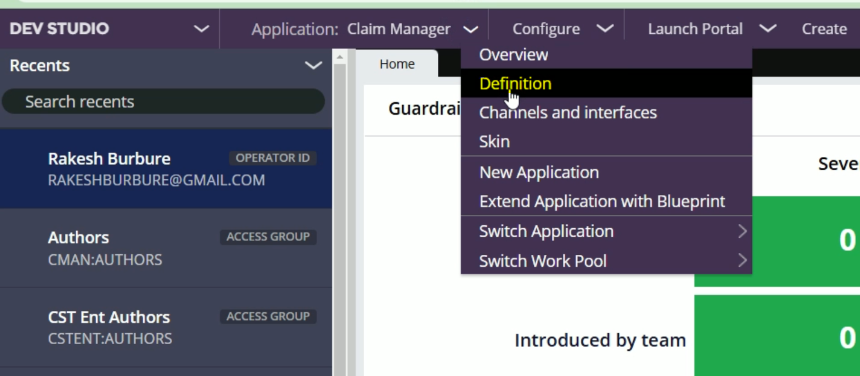
So, for this lets switch to the Dev Studio.
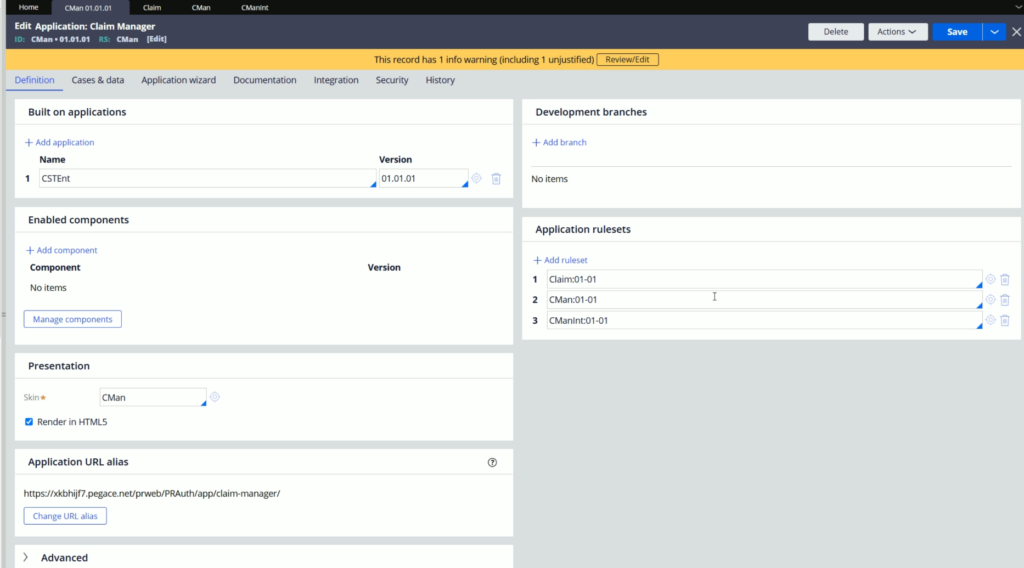
From the Dev studio, go to Application menu > Select Definition to open the Application rule.
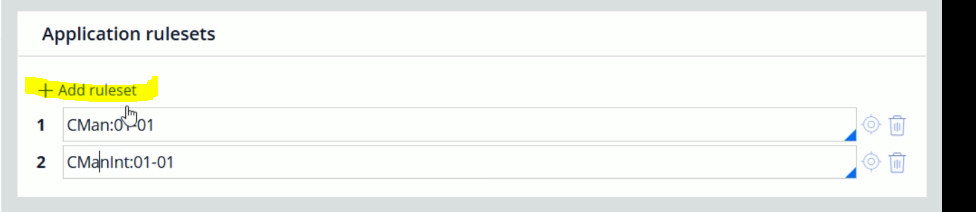
At the moment, there are two Rulesets in the application. Lets click +Add ruleset
After this, enter the ruleset name and click the create new rule icon.
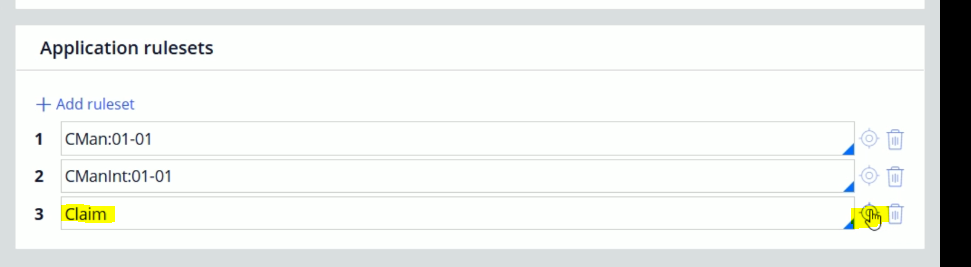
Here, without making changes, click Create and open

Click Save
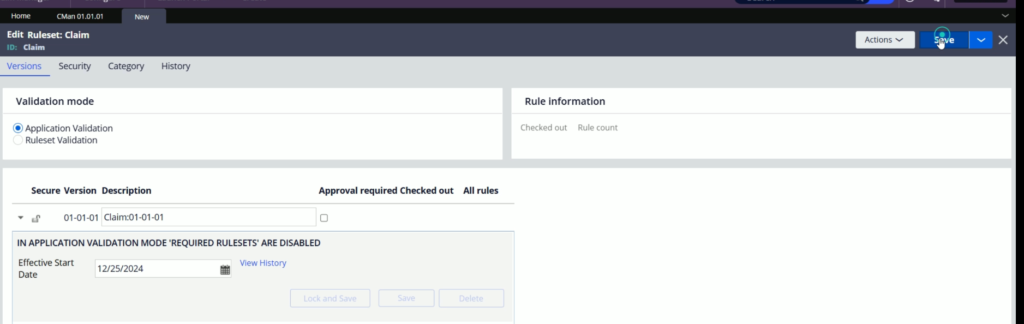
So here, our new Ruleset is open. Just observe, here we have one Ruleset version open, i.e. Claim:01-01-01
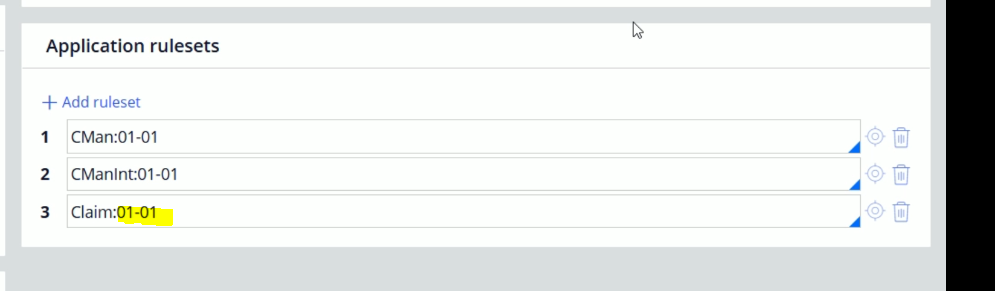
Now, go back to the Application rule and After Claim, add colon and 01-01 to make it lie below.
Now, drag and drop Claim to the top of the list.
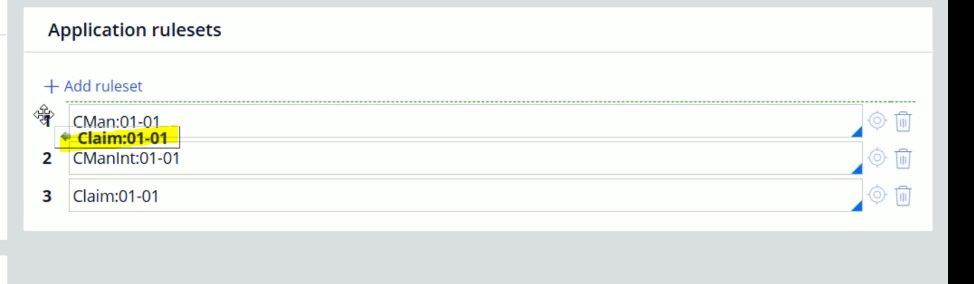
Save the rule

Here, we have one open RSV(Ruleset Version) in Claim ruleset, i.e. Claim:01-01-01 which is required here.
Now open the CMan ruleset. Just click on the icon
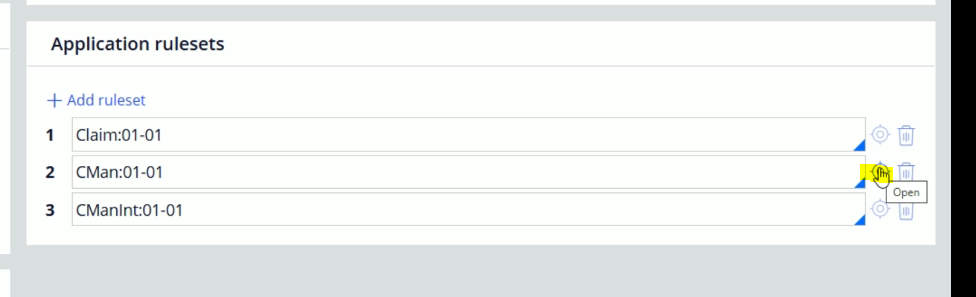
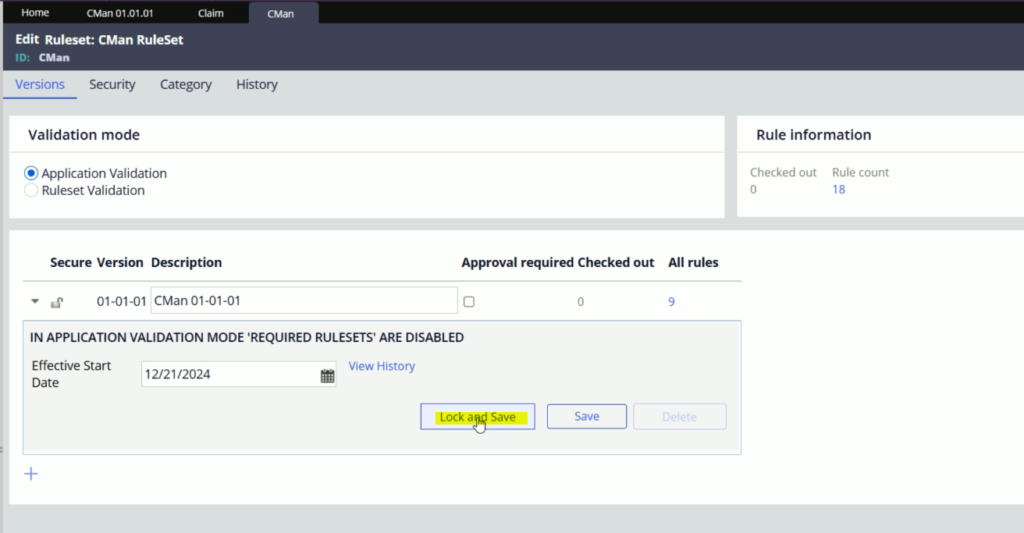
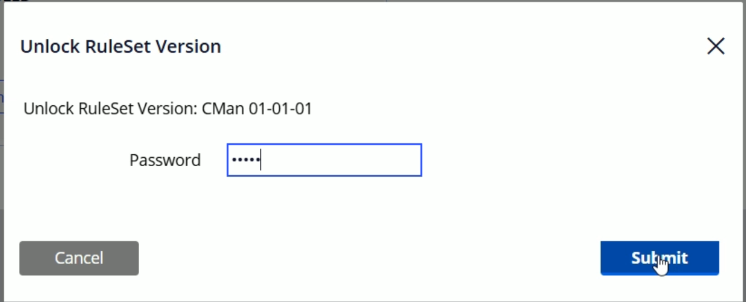
The Ruleset will get opened. Here we need to lock all the open RSVs. Here you will find only one open RSV i.e. CMan:01-01-01. Just click on Lock and save for that.
While locking the RSV, you will need to provide a password. For e.g. rules
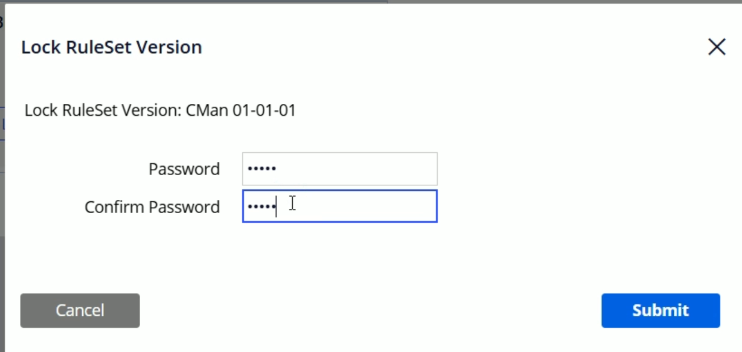
Click Submit.
Now go back to Application rule and follow the same steps to lock the CMainInt:01-01-01 RSV as well.
Make sure you lock all the RSVs except Claim:01-01-01
Here we re done with the prerequisite to create the case type. You will need to follow this practice every time you create a new Case type.
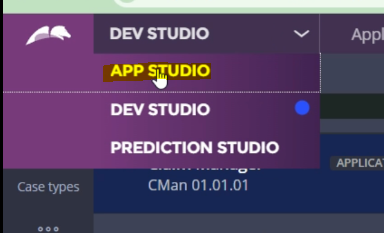
Now, lets go back to App studio.
From App studio, let clikc Case types from the Left side menu
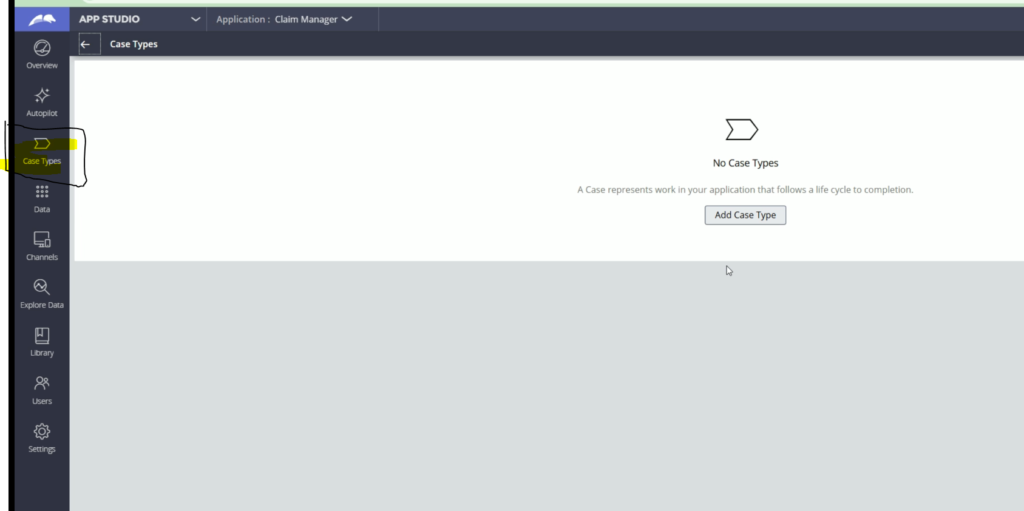
Here, click Add Case Type.
Here, we are not going with the Autopilot suggestions, as we have our idea in mind.
From here, lets enter the Case type name as Claim
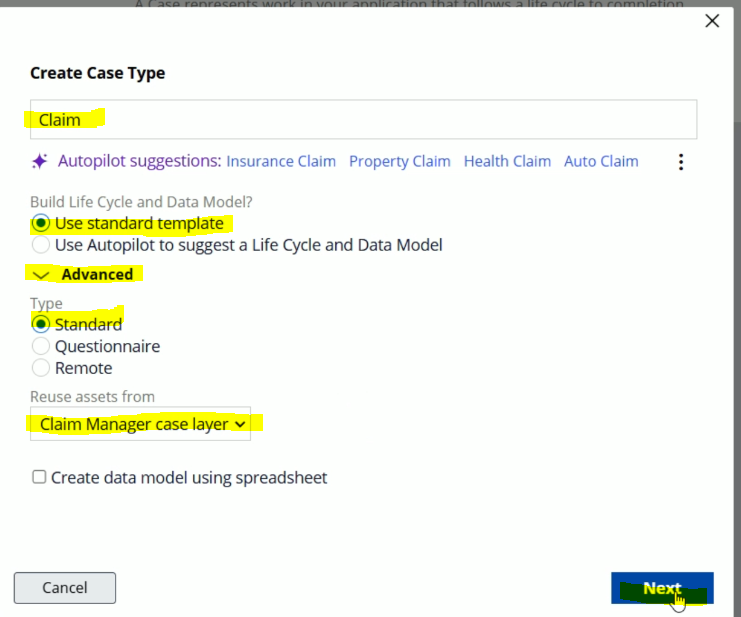
After this, select Use standard template as shown.
If you click Advanced, you will find more options. We need not to make any changes here.
Click Next.
After some time, it will create the Case type for us.
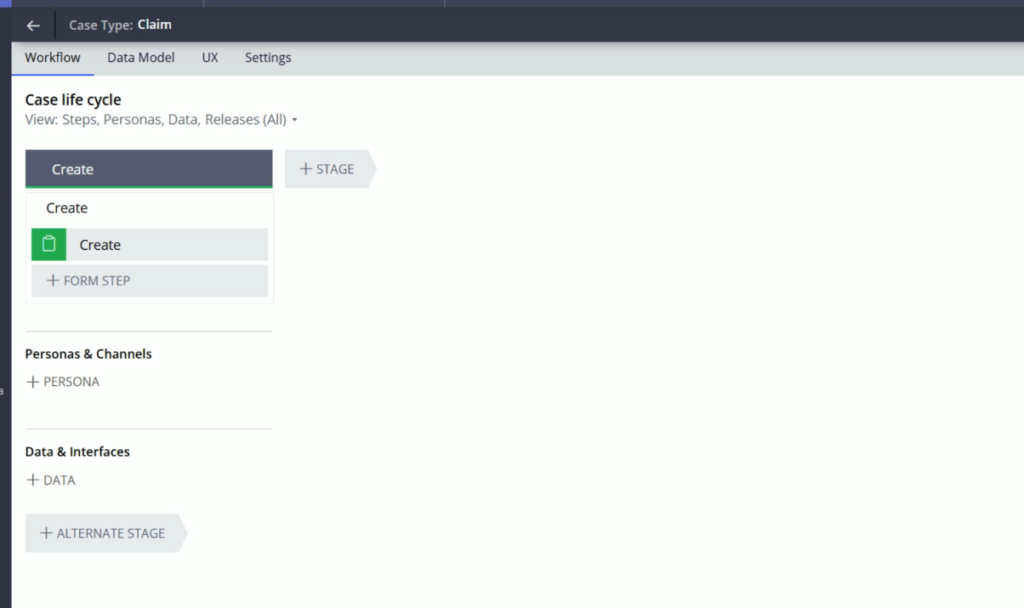
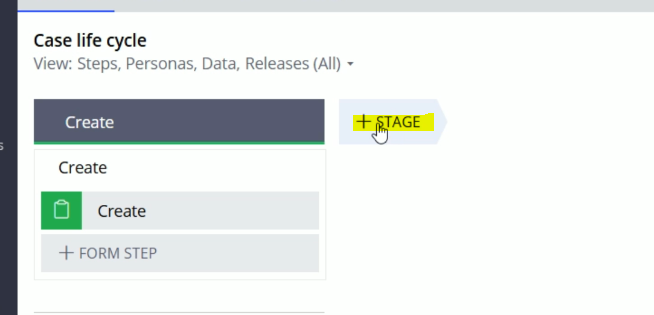
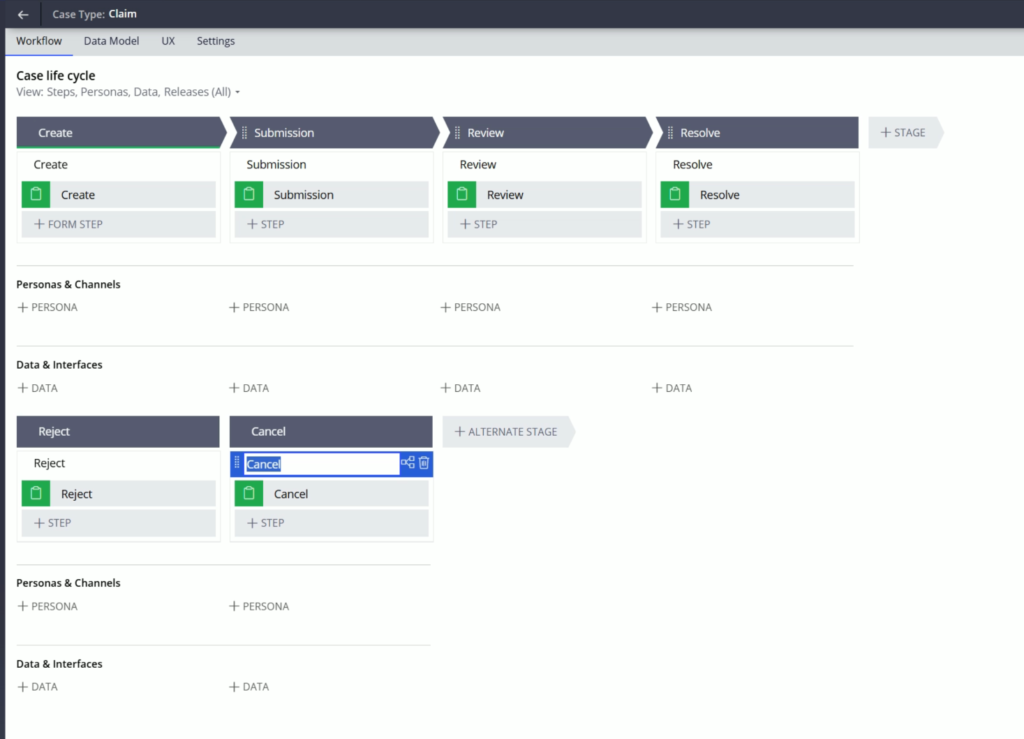
By default, you will find a Create stage with a process and step within in. This is the initialization stage. And you cannot delete this stage. You will configure all the initialization logic related to your case type here in this stage. If don’t have any such requirement, you may keep it blank.

You will find +STAGE icon, and by clicking this, you can add the Primary stages, Primary stages are the part of the happy path of the business requirement.

At the bottom you can see +ALTERNATE STAGE. By clicking this, you can add alternate stages, which is required for the exceptions
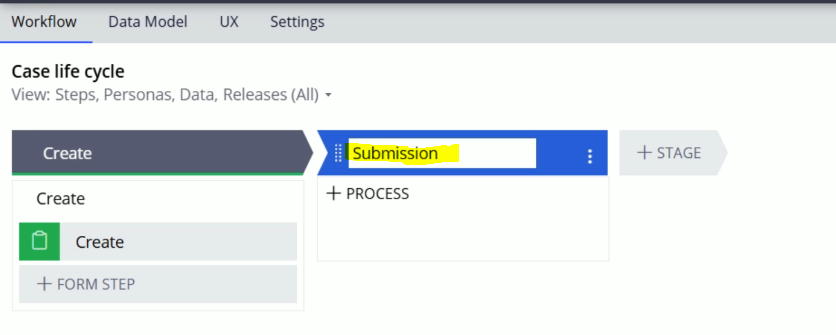
Lets click +STAGE icon.
And lets provide a name to this stage: Submission
Le this, add two more stages, Review & Resolve.
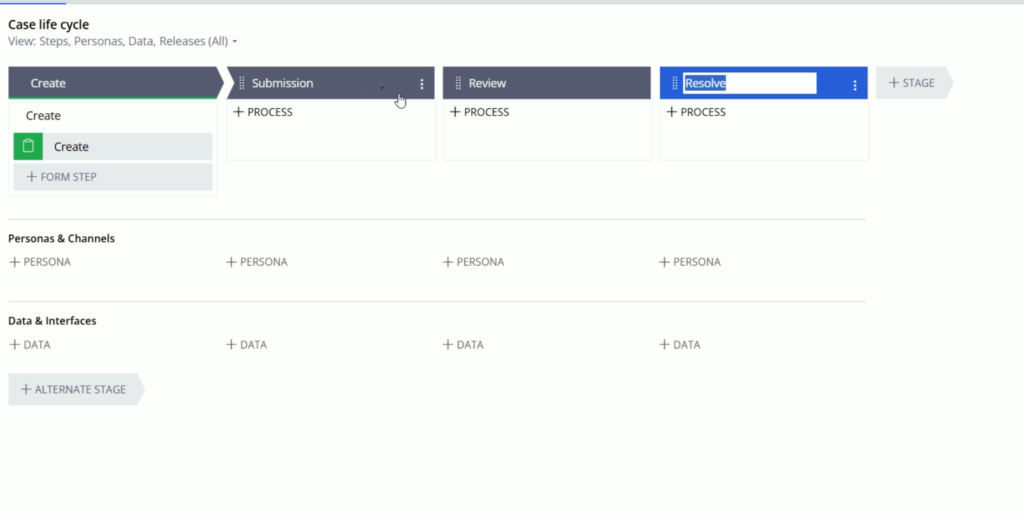
Submission, Review & Resolve are the primary stages and they will define the happy path of this Case type.
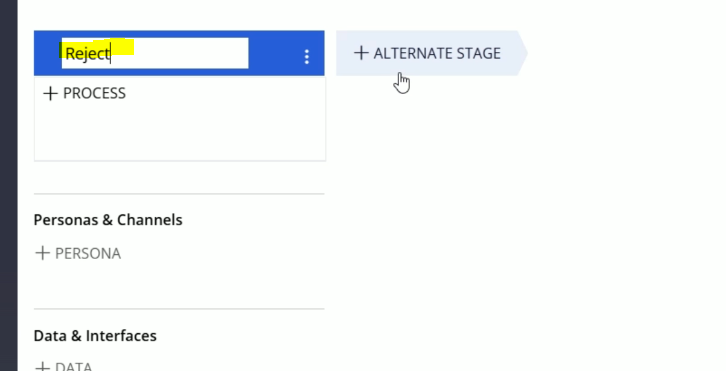
Now, lets add Alternate stages. Lets click +ALTERNATE STAGE

Lets enter the name: Reject
Just like this add one more alternate stage: Cancel
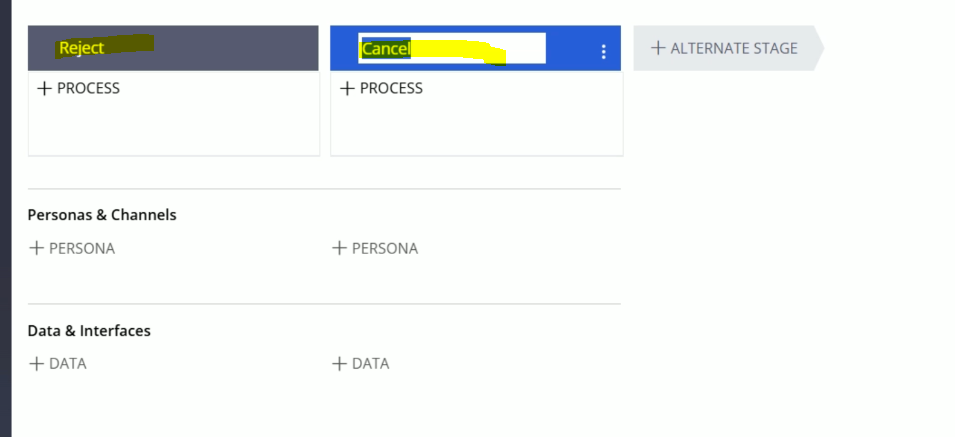
Here, Reject & Cancel are the alternate stages. And we will follow this stages in case of exceptions in the happy path only.
E.g. Lets say, the Claim case got rejected from Review stage, then it will go to Reject stage, which will denote the Claim request has been rejected. And one more example could be like: the end user is not willing to continue with the claim request and he wants to cancel the claim request. In this case, the Claim case will go to Cancel stage.
Now Save the Case type.
So, here have configured the necessary stages. Its time to configure the process in it.
For Submission stage: put cursor on stage, and click three vertical dots.
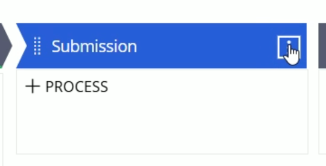
From here, go to Add process > New process…
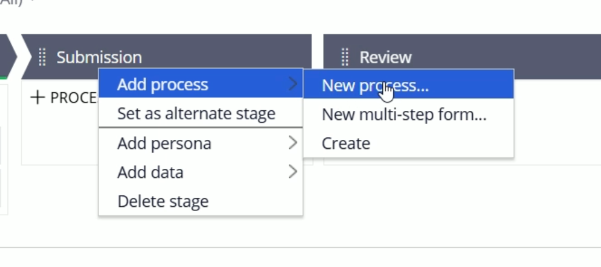
This will add a new process and step within it.
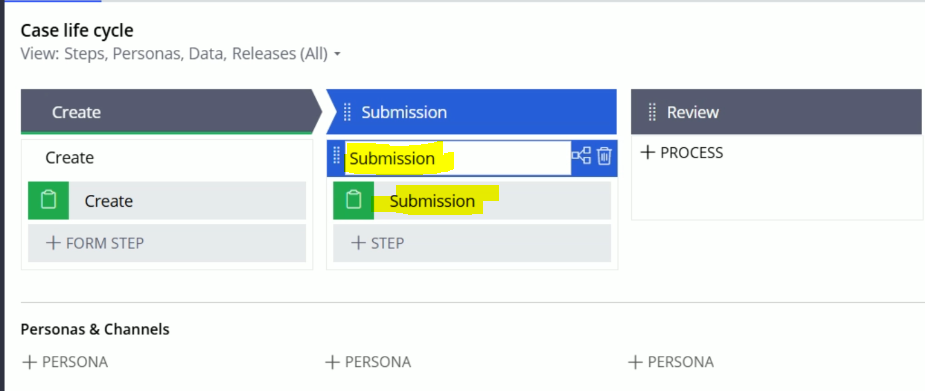
At the moment, we are not going to configure this step.
Lets add the processes to each stage in the same way.
And save the case
So, here we are done with adding the Stages & Processes to it. At the moment, we haven’t configured any view here.
We are going to have a separate blog for View design.
So make sure you stay tunes for the updates.
Now lets go back to the Dev Studio.
And open the Claim Ruleset again.
If the Claim ruleset tab is already opened, then refresh it. For this go to Actions > Refresh
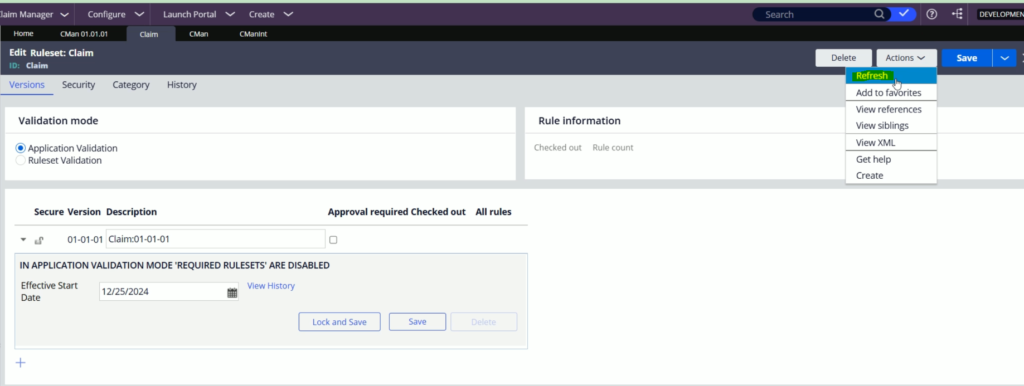
And here you will find it has 36 rules.
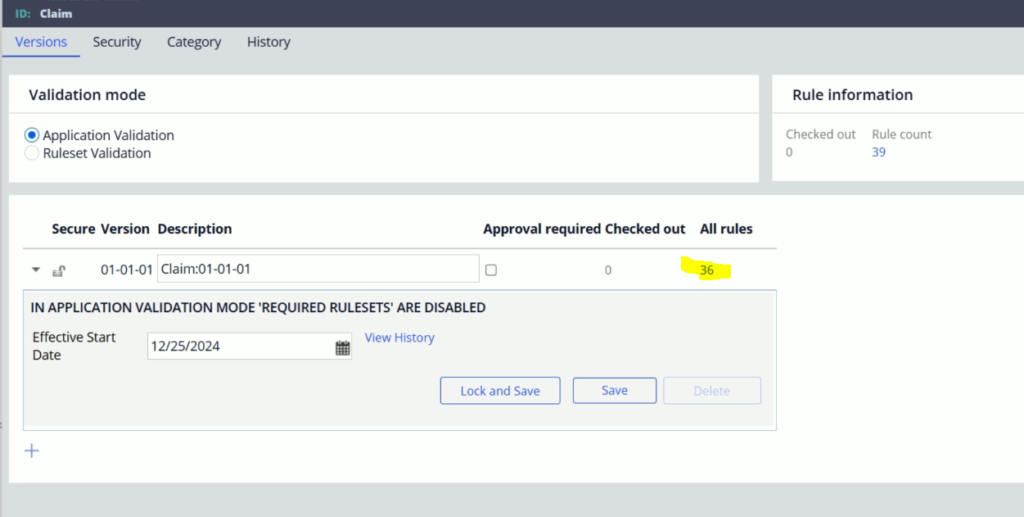
Moving forward, whatever changes we do for Claim case type, the changes will get saved in the Claim RSV.
Its time to unlock the CMan & CMan RSVs. For this you need to click on the Unlock and Save button.
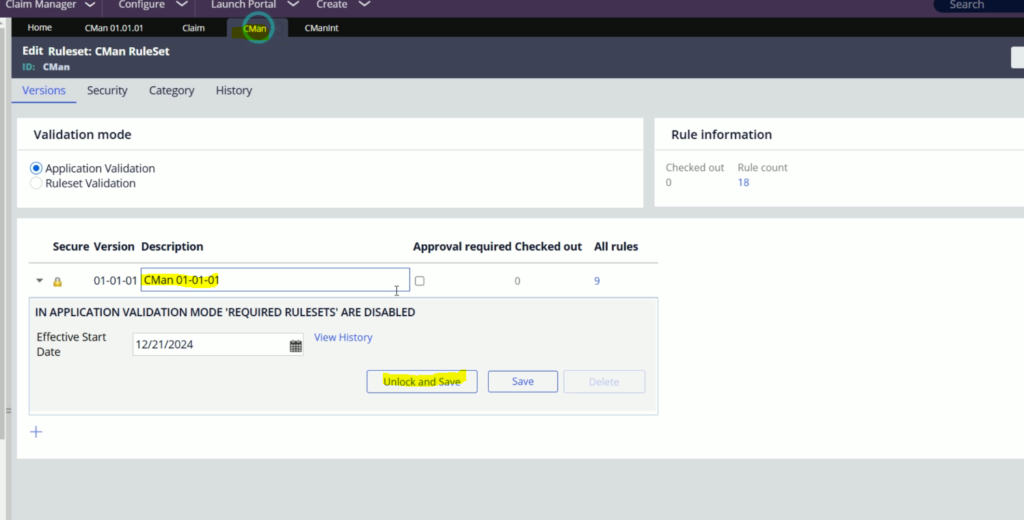
Enter the password
And click Submit. CMan:01-01-01 is unlocked now.
In the same way, unlock CMainInt:01-01-01 RSV as well.
Now, go back to the Application rule
And drag and drop Claim ruleset at the bottom.
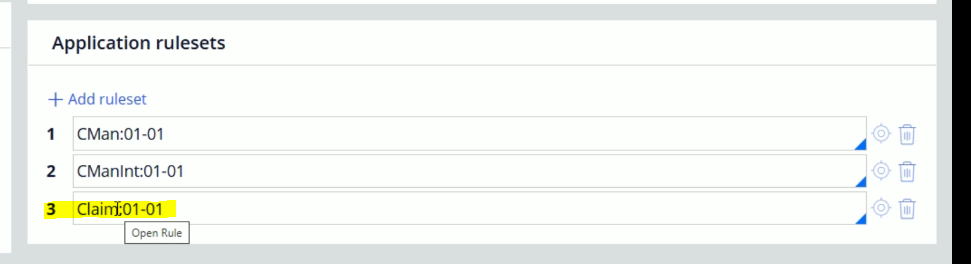
Now, click Save to save the application.
So whenever you want to create a new case type, make sure you lock all other RSVs, create a separate Ruleset for your case type and bring this ruleset to the top in the Application rulesets.
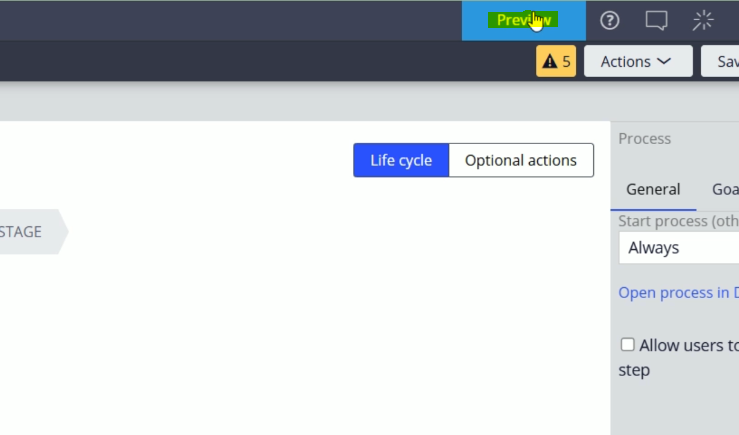
Now lest switch back to App Studio
Lets click Preview
From here, click on the + Create Icon and click Claim
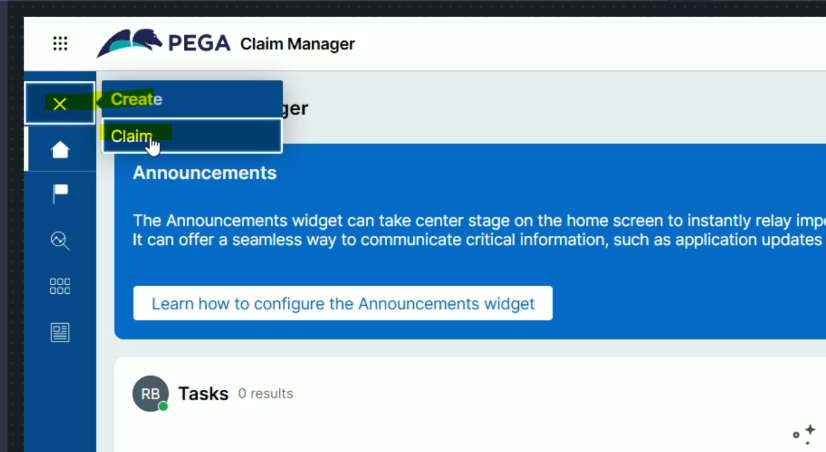
This will create a new case for us.
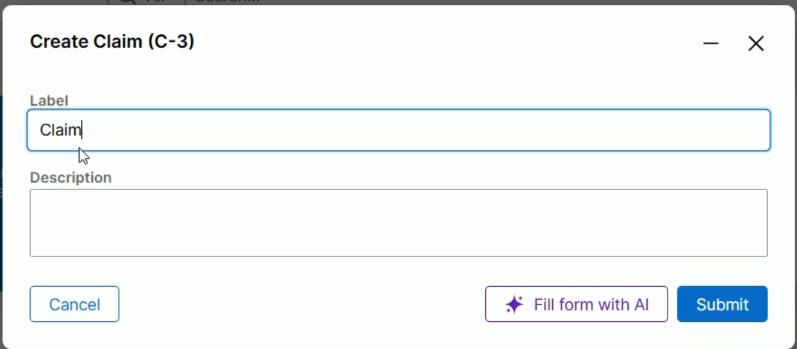
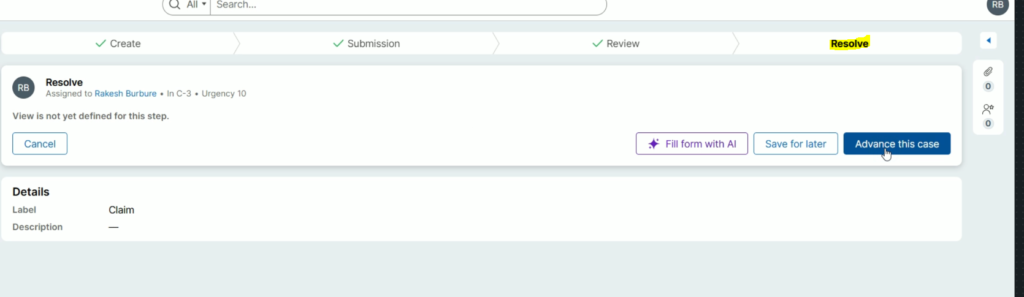
At the moment, no view is configured, so you will not find any details over here.
Click Submit
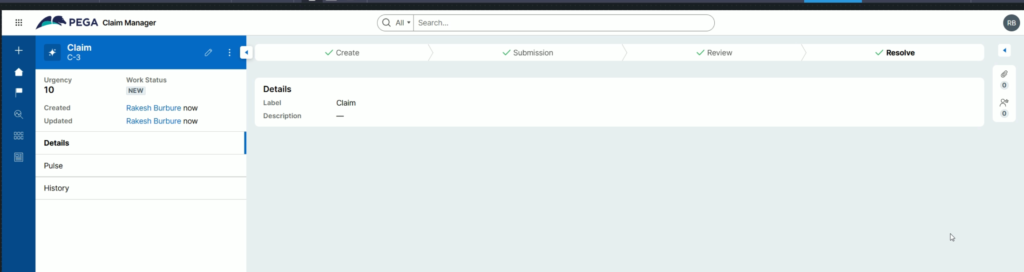
From Create, the case has went to Submission stage.
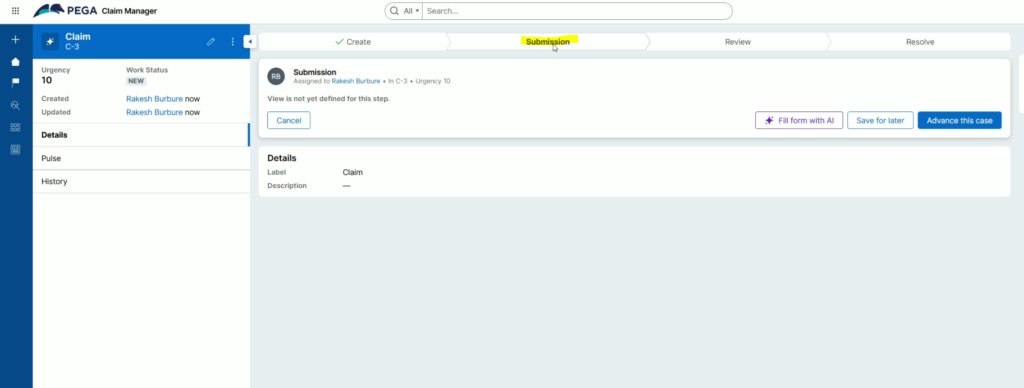
Click Advance this case
The case has went to Review stage
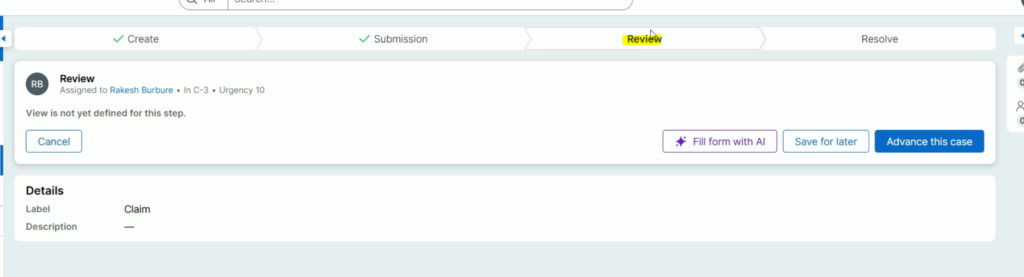
Click Advance this case
Now, its in Resolve stage
Click Advance this case
Now the happy path has finished and case got resolved.